What is this?
Let’s say you wanted to buy a domain like Fig.Systems. You can host a personal blog at this address. Once you buy the domain not only can you host content but you with a bit more tinkering you can send and receive emails with the domain.
You can email eddie@fig.systems or admin@fig.systems and that email will make its way to my inbox. You can set up rules to handle specific addresses too.
You’ll need to create accounts for the following:
- Mailgun.com
- porkbun.com
Setting it up
1. The Domain
You can buy a domain from any regitrar, I recommend PorkBun or Cloudflare. I’ll be using Porkbun for this discussion.
Pricing will depend on the name and what TLD (the @something.com part). I occasionly run into issues with sites not recognizing eddie@fig.systems as a valid email address because it’s a lesser known domain.
Once you have it you can enter DNS records to to where you host stuff or start using it for email.
2. The Email
Email is one of those things you shouldn’t host yourself, it’s very annoying. But luckily there’s services out there that take care of most of the hassle. MailGun and SendGrid are two such services. I’ll be using Mailgun here.
With Malgun I can:
- Receive emails at custom email addresses with my domain
- Route those emails based on rules
- e.g. Emails sent to
no-reply@fig.systemsare completely dropped
- e.g. Emails sent to
- Send emails AS those email addresses through gmail
- Receive an email at
admin@fig.systemsat my regular gmail account and reply asadmin@fig.systems
- Receive an email at
- Use their API to programmaticaly send emails
- Use their SMTP servers to send as custom email addresses
- My self hosted services send notification emails as
no-reply@fig.systemsor asservice_name@fig.systems
- My self hosted services send notification emails as
3. Setting up DNS
- Buy a domain at porkbun.
Pick your favorite. I’ll be using figgy.foo for this, there was a good deal on it.
- Log into Mailgun
- Go to Send -> Sending -> Domains
- Click on “Add New Domain”
- Add
figgy.foo, leave the rest blank, click Add Domain
- Add DNS records to porkbun.
You’ll be provided with records for sending, receiving, and tracking.
In Porkbun Domain Management select DNS when you hover over your new domain.
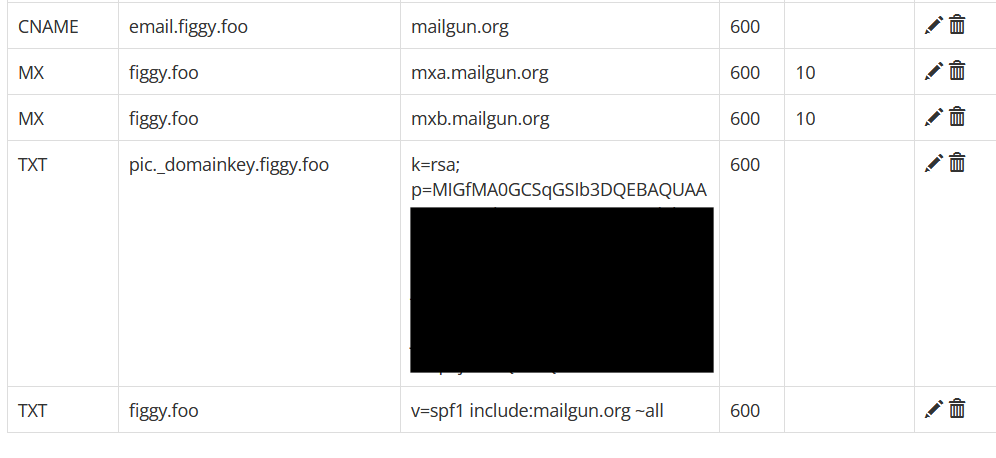
Copy the entries over. Make sure the Types match and that you leave off the figgy.foo portion in the host field in porkbun. Anything you add in the host field will automatically append your domain to the end of it. If the field is just figgy.foo then the host field blank.
Copy all the Value fields from Mailgun to the Answer field in Porkbun and then click on Verify at the top right. You should see the status change to Active.
This is what your records in porkbun should look like.

4. Setting up Mailgun
Routing emails.
Go to Send -> Receiving and Create a Route.
Expression Type -> Match Recepient
- Enter
admin@figgy.foo
- Enter
Enable Forward and fill in your personal address. For me that’d be my normal gmail address.
Set priority to 50 so you have space to add future routes before or after this route.
Add a simple description like “send to gmail” and Create the Route.
At the free teir you can only have 5 routes total. I only use the following:
- Match
no-reply@figgy.foo, Store and Notify and Stop processing. - Match
family@figgy.foo, forward that email to multiple family members.- Useful for events and family plans.
- Match
Kindle@figgy.foo, forward to my custom Amazon provided kindle email address for sending epubs/pdfs.- much friendlier address than what they make for you.
- A catch all final route that just forwards to my personal address.
Number 4 is where most of the magic and utility of setting all this up happens. I can give out unlimited custom email address and I’ll know who sent them by the address. That is if I give out businessName@fig.systems I can later use that in gmail to filter, block, or search for anything related to that business. I can even see who sold my info if I start getting spam from that address.